Smoky Eyes: A Step-by-Step Guide for Beginners

The Art of Creating a Smoky Eye
The smoky eye makeup look is far more than a fleeting trend; it is a cherished staple that enhances the natural beauty of your eyes while infusing your overall appearance with a captivating edge. Whether you are gearing up for a glamorous night out or simply enhancing your everyday makeup regimen, perfecting this technique opens the door to endless possibilities in beauty. This guide will introduce you to the essentials of achieving that enviable smoky eye.
Before you start experimenting, it’s crucial to grasp the foundational elements that transform this look from ordinary to extraordinary. Here are a few key features to explore:
- Eyeshadow Colors: Rich shades like blacks, deep grays, dark browns, and even navy blues are best for creating the signature smoky effect. These colors can be mixed and matched, and they do wonders in drawing attention to the eyes.
- Blending Techniques: Mastering the art of blending is paramount. Transitioning between shades using circular motions or back-and-forth strokes allows for a seamless gradient effect, ensuring no harsh lines are visible.
- Tools Required: High-quality brushes are your best friends when it comes to blending and layering. Essential tools include a flat brush for applying color, a blending brush, and possibly a pencil brush for precision. Additionally, don’t forget a good primer to enhance color pay-off and a setting spray to lock in your look for hours.
For many aspiring makeup enthusiasts, the smoky eye serves as a rite of passage. It’s not merely a matter of slapping on dark shadow; it’s an intricate dance of layering and shading that creates depth, allure, and a sultry vibe. With regular practice, anyone can master this technique, irrespective of their makeup experience.
Step-by-Step Guidance for Beginners
Embarking on your smoky eye journey can be intimidating, but fear not! Follow this easy-to-navigate, step-by-step guide tailored specifically for those stepping into the makeup arena:
- Start by applying an eyeshadow primer to your eyelids to ensure longevity and vibrancy.
- Using a flat brush, apply your chosen deep eyeshadow color (e.g., black or charcoal) across the eyelid.
- With a blending brush, take a mid-tone shade—such as taupe or dark brown—and blend it into the crease, merging it with the darker shade for a smooth transition.
- To brighten the eyes, dab a light, shimmery color in the inner corners and on the brow bone as a highlight.
- Finish off with black eyeliner along the upper lash line, smudging it slightly for added drama, and complete the look with volumizing mascara.
As you explore this transformative makeup technique, remember that practice is key. Don’t hesitate to adapt the look to suit your individual style. A smoky eye can be tailored for any occasion, from subtle and soft for daytime in a coffee shop to bold and daring for an evening gala. Say goodbye to the intimidation often felt when facing intricate makeup techniques and welcome a newfound realm of creativity into your beauty routine!
DISCOVER MORE: Click here to learn how to tailor your skincare routine
Unveiling the Smoky Eye Technique
The smoky eye look captivates beauty enthusiasts and professional makeup artists alike. Transitioning from daytime looks to sultry evening glamour is made effortless with this versatile technique. For beginners, the allure of smoky eyes is often met with trepidation, as the nuances of blending and color selection can be daunting. However, with a few essential tips, you can master this art and create stunning eye makeup that elevates any look.
To begin, understanding the foundation of smoky eye makeup is essential. Here are some crucial considerations to keep in mind:
- Color Selection: The heart of a smoky eye lies in rich, bold colors. Choose from deep grays, blacks, purples, or even subtle hues of navy blue, allowing you to experiment and find what suits your eye color and skin tone. Each shade can bring out a different aspect of your eyes, making it an exciting journey of exploration.
- Textural Variations: Incorporating different textures—creams, matte, and shimmers—can enrich the overall appearance. Cream shadows work excellently for a base, while matte shades offer depth and dimension, and shimmer can add a touch of sparkle.
- Application Methods: Technique plays a significant role. Learning how to layer and blend without leaving harsh lines takes practice, but utilizing the right tools can simplify this process dramatically. Ensure you have a set of high-quality brushes on hand, including a flat brush for application, a blending brush for softening edges, and a precision brush for fine detailing.
In the realm of eye makeup, the smoky eye is often seen as a benchmark of skill. It’s not merely about using dark colors but achieving a harmonious blend that enhances your eye shape and size. Remember, the goal is to make your eyes the focal point, alluring yet polished. Beginners should focus on simplicity while mastering the essential principles of this technique before advancing to more complex styles.
Gathering Your Essentials
Before diving into the step-by-step guide, it’s important to have all your materials at hand. Preparing your workspace will make the process smoother and more enjoyable. Here’s a checklist of items you’ll need:
- Eyeshadow primer
- Flat eyeshadow brushes (at least one for packing color)
- Blending brushes (preferably a couple in different sizes)
- Pencil brush for detailed work
- Selection of eyeshadows in your desired shades (including a highlighter)
- Black eyeliner (pencil, gel, or liquid)
- Volumizing mascara to finish off the eye look
- Setting spray to lock in your masterpiece
Once you’re equipped with these essentials, the journey into the world of smoky eyes becomes an exciting adventure. Remember, each attempt brings you closer to refinement, so embrace the learning process and don’t hesitate to modify and adapt these guidelines to create a signature look that feels uniquely yours!
The smoky eye is not just a makeup technique; it’s a bold expression of personality and style. For beginners diving into the world of smoky eyes, understanding the fundamentals is crucial. Mastering this iconic look involves knowing the right tools and techniques, which can transform any eye shape and enhance your overall appearance.
First, gather the essential tools: a good quality eyeshadow palette featuring deep and neutral shades, blending brushes, an eyeliner pencil, and mascara. The right brushes make a significant difference when blending colors seamlessly. Start with a primer to create a smooth canvas for your eyeshadow and increase its longevity.
When selecting colors, remember that smoky eyes don’t just mean black; experiment with various hues like deep browns, purples, or even vibrant blues to suit your personal style. Begin by applying your base color across the lid, then gradually build up darker shades towards the outer corners. The key to a stunning smoky eye is blending. Use soft, circular motions with your blending brush to achieve that effortless look.
Don’t shy away from adding depth with a dark eyeliner along the lash line, followed by plenty of mascara for a dramatic finish. It’s essential to practice your technique; the more you do, the more comfortable you’ll become with achieving that perfect smoky eye.
| Category | Advantages |
|---|---|
| Tools | Quality brushes and palettes ensure easier application and blending. |
| Techniques | Step-by-step methods make mastering smoky eyes simpler for beginners. |
With practice, you’ll discover your unique smoky eye style, leaving you ready to dazzle any occasion. Each attempt will build your confidence and expertise in makeup artistry, opening the door to exciting new possibilities. Investing time in learning these fundamental skills will reward you with a versatile look that never goes out of fashion. Embrace the journey, and let your creativity shine!
DISCOVER MORE: Click here to learn about the environmental impact
Creating Your Smoky Eye Look
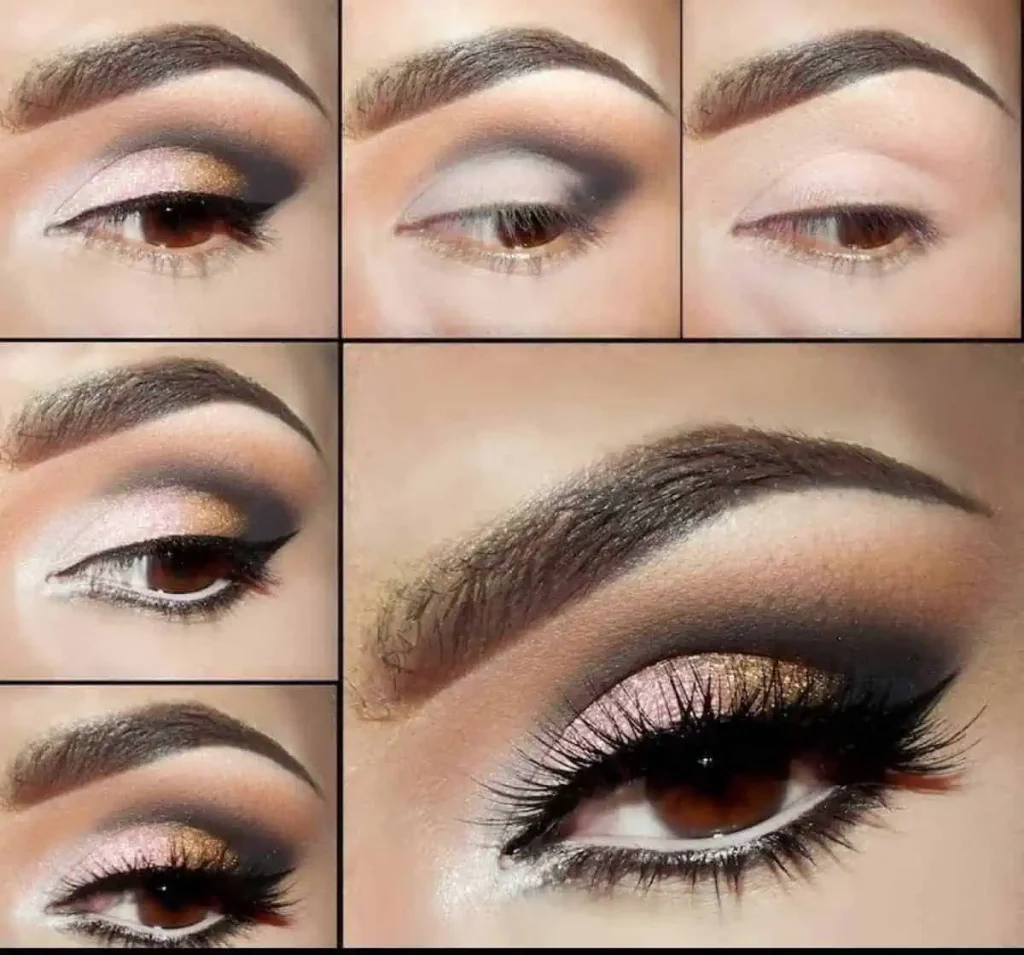
Now that you have gathered your essentials and understood the fundamentals of the smoky eye technique, it’s time to dive into the step-by-step application process. Each step builds on the previous one, allowing for a gradual development of skill and confidence.
Step-by-Step Application
Step 1: Prime Your Eyelids
Before any color touches your eyelids, apply an eyeshadow primer. This step not only ensures longevity but also helps in achieving a more vibrant color payoff. A good quality primer can significantly improve your smoky eye effect, preventing any creasing or fading throughout the day or night.
Step 2: Lay Down the Base Color
Using a flat eyeshadow brush, apply a cream or nude eyeshadow across your entire eyelid. This base can brighten your eyes and serve as a neutral canvas for the darker shades you will be adding. It’s important to blend the base shade smoothly into the crease to create a seamless transition.
Step 3: Apply the Dark Shadows
Choose your main dark shade (for instance, a charcoal gray or deep plum) and place it on the outer corner of your eyelid. Using a packing motion, build the intensity gradually while keeping the harsh edges minimal. Once you’ve created your desired depth, begin blending the shadow into the crease using a fluffy blending brush.
Step 4: Blend, Blend, Blend
This pivotal phase is where many beginners struggle. There’s no substitute for good blending, so be patient. Use a clean blending brush to soften the edges of the dark shadow. Windshield wiper motions across your crease will help create a gradient effect. Remember that the smokiness should come from well-blended colors rather than harsh lines.
Step 5: Illuminate the Inner Corner and Brow Bone
To balance the intensity of the dark shades, apply a light, shimmery highlighter to the inner corners of your eyes and beneath your brow bone. This touch adds brightness and draws attention, enhancing the illusion of bigger, more awake eyes.
Step 6: Define Your Eyes with Eyeliner
Whether you opt for pencil, gel, or liquid, using a black eyeliner along the upper lash line is essential. To achieve a more dramatic effect, slightly extend the line towards the outer corner, incorporating a subtle cat eye flick. For a softer look, consider a pencil liner, which can also be smudged into the shadow to create a smoky edge.
Step 7: Lower Lash Line
Don’t forget about the lower lash line! Using a small, precision brush, apply the same dark shadow you used on your lid, blending it out for that quintessential smoky effect. Adding a touch of your base color to the inner part of the lower lash line can open up the eyes even more.
Step 8: Finish with Mascara
The last step to your smoky eye journey is essential—liberally apply volumizing mascara to both your upper and lower lashes. This step amplifies the drama and brings attention to your newly crafted eye makeup. Remember to let the mascara dry completely between coats for maximum volume.
Optional Enhancements
<pWhile the classic smoky eye is dazzling on its own, you can always customize your look with optional enhancements:
- False Lashes: For those seeking added glamour, false lashes can enhance the overall effect of your smoky eye.
- Colored Liners: Experimenting with colors beyond classic black can also define your look. Consider using burgundy, navy, or even emerald-green liners for a more unique touch.
- Glitter: For those special nights out, adding a touch of glitter on the center of the eyelid can create a captivating luminosity.
As you continue to practice these steps, your confidence in executing the smoky eye look will grow, paving the way for your own creative expressions. Remember, the key is to have fun and enjoy the process of discovering your signature smoky eye style.
DISCOVER MORE: Click here to learn about natural ingredients in cosmetics
Conclusion
Mastering the smoky eye look is a transformative experience for any makeup enthusiast, especially for beginners looking to make their mark in the makeup world. By following the well-defined steps outlined in this guide, you can develop your skills and refine your technique, ensuring every look you create is not only stunning but also suits your personal style. From strategically priming your eyelids to seamlessly blending various shades, each step builds your confidence and makes smoky eyes accessible to everyone.
It’s important to remember that practice is key. With time, you’ll learn how to play with color, explore different textures, and experiment with various enhancements, such as false lashes or glitter, to elevate your look for special occasions. As your technique improves, don’t shy away from customizing your smoky eye; allow your creativity to flourish by trying out unexpected hues, like deep greens or rich burgundies, setting trends rather than following them.
The smoky eye transcends trends and seasons, remaining a classic choice for any makeup collection. Whether you’re attending a casual outing, a dramatic night out, or simply looking to express yourself more boldly, mastering this eye makeup look will have you turning heads and receiving compliments. So gather your supplies, follow the steps, and embrace the artistry of smoky eyes—your ultimate canvas awaits!